getting started with our new community forums
Your Profile
Please edit your profile so that other members can find and get to know you.
To view and edit your individual profile, click on the arrow icon next to your name in the top main navigation.
Click “Edit Profile”.
Fill out the information about yourself.
Other members will be able to find you based on your ERP and Application information that you provide.
Grayed out areas pertain to your company's membership and can't be customized here. Contact your company's primary TUG membership representative if you feel any of these areas need to be revised.
Dashboard
Your Dashboard is the first page you will see every time you log in.
From this page, you can immediately view all recent content that you have permission to view.
Also note that you will have messages and system notifications at the top that have not been viewed online since your last login. Click on either icon to view.
To immediately start adding content to the online community, click on the Create+ button. This will give you a choice of content that you can create.
Discussions
To create a new discussion thread:
In the main top navigation, click on Discussion under the Create + button
The discussion post is created:
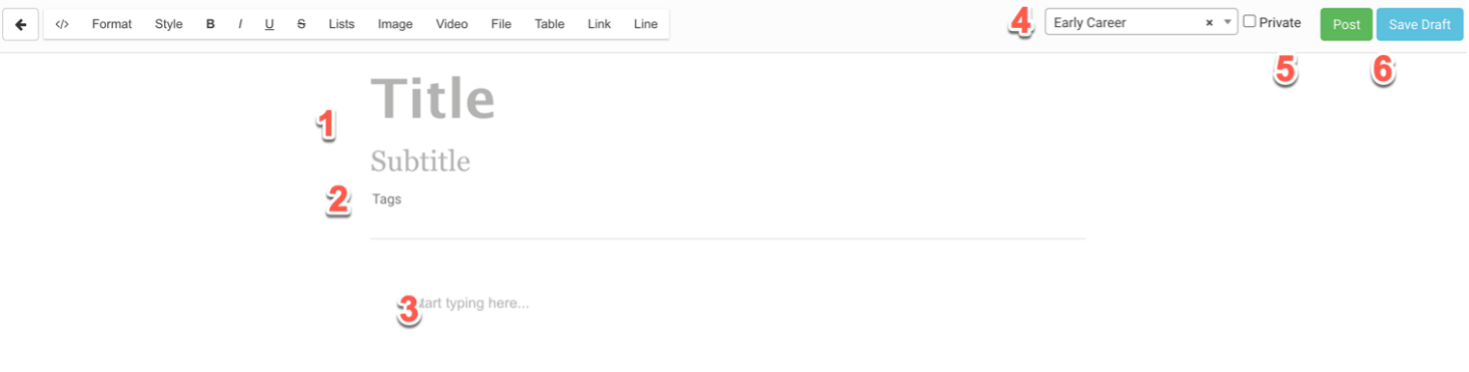
- Add the title of the discussion.
- Create tags if applicable. Type in each word and hit “Enter” to create each new tag.
- Type in the text of your discussion in this area
- Choose the group that the discussion will be posted to.
- Click on the Private checkbox if you want the discussion to be only viewable to members (Only applicable to public groups. The private checkbox will automatically be checked if the group is private)
- Click on the Post button to make the discussion live or click on the Save Draft to save your content for later editing or posting.
To view the new discussion, click on the Open button on the discussion creation page.
You can also view the new discussion listed on the homepage of group that it was posted.
Click on the discussion to view the full discussion thread.
Articles
To create a new article, In the main top navigation, click on Article under the Create + button
The article is created on the following page:

1. Add the title of the article
2. Create tags if applicable. Type in each word and hit “Enter” to create each tag
3. Type in the content of your discussion in this area.(Please note the formatting tools at the top of the page.)
4. Choose the group that the discussion will be posted to.
5. Click on the Private checkbox if you want the article to be only viewable to members (only applicable to public groups)
6. Click on the Post button to make the article live or click on the Save Draft to save your content for later editing or posting.
To view the article, click on the Open button on the article creation page
You can also view the new article listed on the homepage of the group that it was posted.
Click on the article to view the full content of the article.
Importing Articles And videos
TUG's online community allows the import of articles from outside the community. Videos from YouTube and Vimeo may also be imported. Credit will be given to the original publishers. Content will reside on the TUG Community even if it is removed from the original source.
- Go to the Create+ button and choose Import Article.
- Add the article information.
- Copy the link of the webpage
- Choose the group that the article will be posted to.
- Click on the Private checkbox if you want the article or video to be only viewable to the group members (only applicable to public groups)
- Click on the Import button to make the video live on the community
Please note: Creating the video page does not publish the video live
Upon import of the article or video into the group, the user can add tags
Notifications
Notifications are the emails that you will receive when any content is created, edited or deleted.
To change the frequency of the notifications that your receive, click on your user icon and choose Account Settings.
Choose a digest of all notifications in immediately, hourly, daily, or weekly intervals.
Note that 'As-it-Happens' will send an email for every new piece of content including comments.
The Mentions and Messages notification setting is used if a person is @mentioned in a comment or a chat.
Click on Save Changes button to save any edit to the settings.
Network Groups
Network Groups are the where discussions pertaining to specific topics take place. Most are available for you to join and contribute.
Clicking on Groups in the main navigation will bring you to a list of all the Network Groups. Groups that are open for you to join will display a 'Join' button. Once you have joined a group, the button will display 'Go to Page' button.
Getting Around within your group.
- Select 'Create +' in the Network Group sub-navigation. This will allow you to create content (similar to the 'Create +' button in the main nav). The system will automatically auto-populate the Network Group you are currently in.
- Latest Posts displays all content created for this Network Group from the Network Group members.
- Upload documents using the document upload module. You can choose to find the document on your computer or you can drag/drop the file onto the module. These documents will only display within the group if you mark it as 'private'.
- If you belong to many Network Groups, click on the 'Favorite' button to make the Network Group display at the top of the Network Group page.
In-Network Chat
At the bottom of every Network Group page is the in-network chat box. This shows how many people are currently online in the Network Group that you have chosen to follow and your status.
Clicking on the box will expand the box and display users that you have chosen to follow.
- Each person on the list will have a status flag as well.
- Green represents they are online and active.
- Yellow represents they are logged in but have been inactive in their current session for 30 minutes.
To begin a chat, just click on the username and another box will open to start your chat. If the person is not currently online and you send them a chat, they will receive a notification email alerting them to your chat.
upload files
To upload a file, you must go to the group that you want the file to reside.
Once in the correct group, scroll down the page.
There is a module on the right for uploading files.
You can drag and drop a file into the module or click on the link to find the file on your computer.
Once uploaded, the system will present your file in the window.
Please note: The system is capable of previewing PDF and image files but Word, Excel, Powerpoint document are not viewable in the community. You must download the file to your computer to be able to view those file types.
NETWORK LEADERS: ADMINISTRATOR FUNCTIONS
For group Network Leaders, there are additional functions in the community that are available:
Managing users in the Network Group
In the Network Group, the 'Manage' link will appear for Network Leaders.
Clicking on the Manage link will allow you to add to/remove users from your Network, change user roles or feature users.
Please note: you can only add users that are already part of the community.
- To add users, enter a user’s first or last name in the field. The system will create a list of possible users from the community user database. Click on Invite to add the user to the workspace.
2. Name your Collection in the Title field
3. Add all the content by dragging and dropping content from the right menu to the left.
Click the Private checkbox if you only want the post to be visible in your group
Collections
NOTE: In each group, only Network Leaders and the Association Management Team have the ability to create Collections.
- To create a Collection, go to a Network Group and under the 'Create+' menu in the subnav, choose 'Collection.'
- Name your Collection in the Title field
- Add all the content by dragging and dropping content from the right menu to the left.
- Click the Private checkbox if you only want the post to be visible in your group
CREATING EVENTS
NOTE: In each group, only Network Leaders and the Association Management Team have the ability to create events.
To create an event, go to the home page of your group and click on the 'Create Event' button
Fill in the fields on the 'Create an Event' page:
A summary of the event will be displayed after confirmation of the notification.
- The creator of the event can edit or delete the event. If the event is edited or deleted, all invited attendees will receive a notification of the change.
- Clicking on the 'Go To Group' (lower left) button will send the user to the group homepage where the event has been posted in the Upcoming Event section.
- The event will now appear in the group’s dashboard where the event was created.
- Users will be able to view the attendee list but only Network Leaders or Association Management are allowed to remove attendees or change their roles.